通过柯里化函数实现带参数的事件绑定
class Login extends React.Component {
    state = {
        username: '',
        password: ''
    }
    saveFormData = (type) => {
        /* 返回一个函数供事件回调 */
        return (event) => {
            event.persist()
            this.setState({
                [type]: event.target.value
            })
        }
    }
    render() {
        return (
            <div>
                <input placeholder="用户名" onChange={this.saveFormData('username')} />
                <input placeholder="密码" onChange={this.saveFormData('password')} />
            </div>
        )
    }
}
ReactDOM.render(<Login />, document.querySelector("#main"))
不用柯里化实现带参数的事件绑定
class Login extends React.Component {
    state = {
        username: '',
        password: ''
    }
    saveFormData = (type, value) => {
        this.setState({ [type]: value })
    }
    render() {
        return (
            <div>
                <input placeholder="用户名" onChange={(event) => { this.saveFormData('username', event.target.value) }} />
                <input placeholder="密码" onChange={(event) => { this.saveFormData('password', event.target.value) }} />
            </div>
        )
    }
}
ReactDOM.render(<Login />, document.querySelector("#main"))
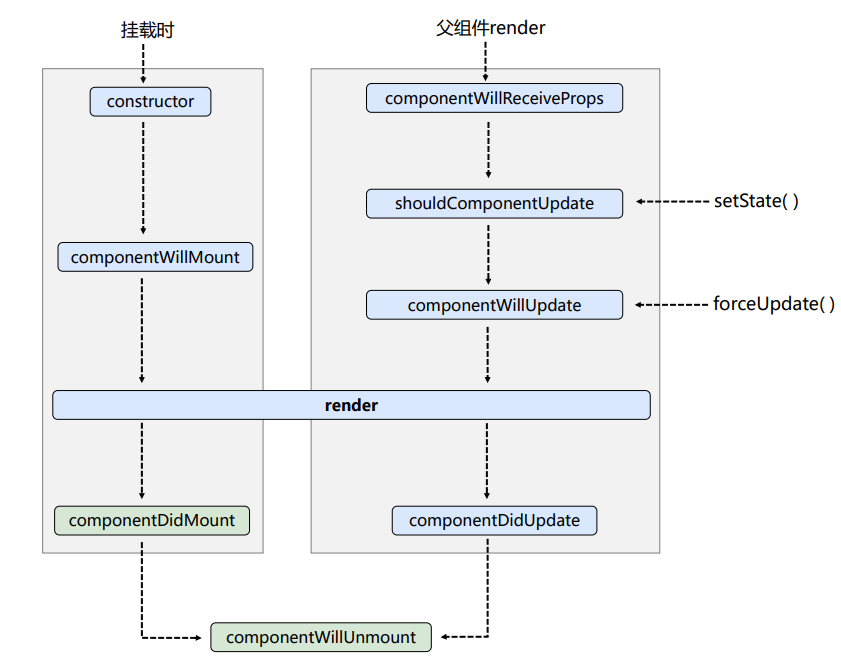
组件生命周期(旧)

1、单个组件时的生命周期钩子
class Count extends React.Component {
    /* 优先执行 */
    constructor(props) {
        console.log('Count---constructor');
        super(props)
        this.state = { count: 0 }
    }

    /* 组件即将挂载的钩子 */
    componentWillMount() {
        console.log('Count---componentWillMount');
    }

    /* 组件渲染的钩子 */
    render() {
        console.log('Count---render');
        return (
            <div>
                <h2>当前值为:{this.state.count}</h2>
                <button onClick={this.addCount}>点击 + 1</button>
                <button onClick={this.deleteComponent}>卸载组件</button>
                <button onClick={this.forceUpdateComponent}>强制更新</button>
            </div>
        )
    }

    /* 组件渲染完毕的钩子 */
    componentDidMount() {
        console.log('Count---componentDidMount');
    }

    /* 组件将要卸载的钩子 */
    componentWillUnmount() {
        console.log('Count---componentWillUnmount');
    }

    /*
     *
     * 控制组件更新的阀门
     * 每次执行setState更新state的时候,都会询问这个阀门
     * 如果返回true,则允许渲染,否则反之
     * 如果没有写这个钩子,则React底层会默认补充这个函数,并且返回true
     *
     */
    shouldComponentUpdate() {
        console.log('Count---shouldComponentUpdate');
        return true
    }

    /* 组件将要更新的钩子 */
    componentWillUpdate() {
        console.log('Count---componentWillUpdate');
    }

    /* 组件更新完毕的钩子 */
    componentDidUpdate() {
        console.log('Count---componentDidUpdate');
    }

    addCount = () => {
        let { count } = this.state
        this.setState({ count: count + 1 })
    }
    deleteComponent = () => {
        ReactDOM.unmountComponentAtNode(document.querySelector('#main'))
    }
    forceUpdateComponent = () => {
        /*
            * 强制更新组件
            * 不经过阀门,不需要修改state的状态
            *
            */
        this.forceUpdate()
    }
}
2、父子组件的时候,子组件有一个componentWillReceiveProps钩子
/* A是父组件 */
class A extends React.Component {
    state = {
        name: '杜恒'
    }
    render() {
        return (
            <div>
                <h2>我是A组件</h2>
                <button onClick={this.changeName}>点击传递Props</button>
                <B name={this.state.name} />
            </div>
        )
    }
    changeName = () => {
        this.setState({ name: '哈哈哈' })
    }
}
/* B是子组件 */
class B extends React.Component {
    componentWillReceiveProps(props) {
        console.log('B组件触发了componentWillReceiveProps', props);
    }
    render() {
        return <div>我是B组件,接收到了{this.props.name}</div>
    }
}
3、旧版本生命周期的总结
初始化阶段
- 先执行 constructor 初始化
- 接着执行 componentWillMount 组件将要挂载
- 接着执行 render 组件渲染
- 接着执行 componentDidMount 组件渲染完毕(常用)
更新阶段
- 先执行 shouldComponentUpdate 组件是否允许更新阀门
- 接着执行 componentWillUpdate 组件将要更新
- 接着执行 render 渲染组件
- 接着执行 componentDidUpdate 组件更新完毕
卸载阶段
- 执行 componentWillUnmount 组件将要卸载(常用)
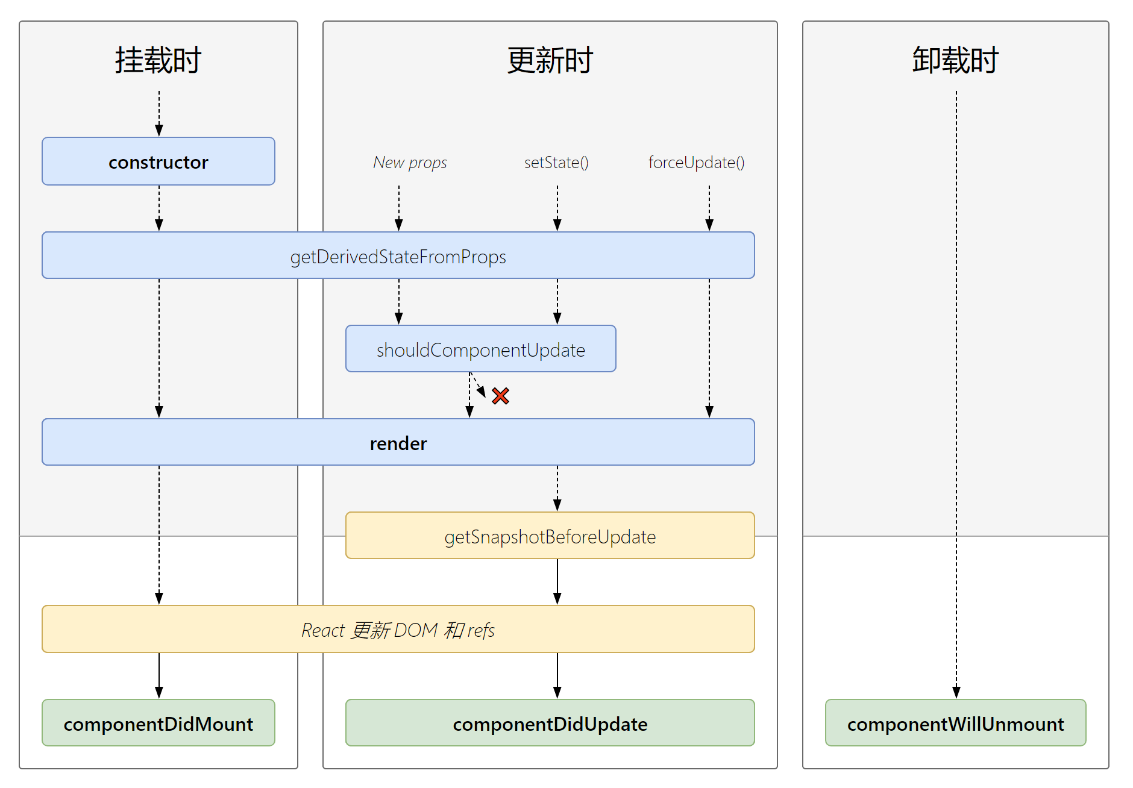
组件生命周期(新)

新版生命周期的总结
初始化阶段
- 先执行 constructor 初始化
- 接着执行 getDerivedStateFromProps 从props里面获取state的派生(将props映射到state上)
- 接着执行 render 渲染组件
- 接着执行 componentDidMount 组件渲染完毕
更新阶段
- 先执行 getDerivedStateFromProps 从props里面获取state的派生(将props映射到state上)
- 接着执行 shouldComponentUpdate 组件能否被更新
- 接着执行 render 渲染组件
- 接着执行 getSnapshotBeforeUpdate 在更新完毕前获取当前快照(当前信息,并将信息传递给更新完毕钩子)
- 接着执行 componentDidUpdate 组件更新完毕(可以获取到上面的快照信息)
卸载阶段
- 执行 componentWillUnmount 组件即将卸载钩子
相对比旧版本的生命周期钩子而言
删除了3个用不上的will钩子 componentWillMount componentWillUpdate componentWillReceiveProps
并增加了2个新的生命周期钩子 getDerviedStateFromProps getSnapshotBeforeUpdate
class Count extends React.Component {
    constructor(props) {
        console.log('constructor执行了');
        super(props)
        this.state = { count: 0 }
    }

    /* 如果想让state的值和props的值一致,那么可以使用这个钩子 */
    static getDerivedStateFromProps(props, state) {
        console.log('getDerviedStateFromProps', props, state);
        return null
    }

    render() {
        console.log('render执行了');
        return (
            <div>
                <h2>当前值为:{this.state.count}</h2>
                <button onClick={this.addCount}>点击 + 1</button>
            </div>
        )
    }

    /* 组件渲染完毕 */
    componentDidMount() {
        console.log('componentDidMount执行了');
    }

    /* 组件能否被更新 */
    shouldComponentUpdate() {
        console.log('shouldComponentUpdate执行了');
        return true
    }

    /*
     *
     * 在更新前获取快照
     * 在即将发生dom更新前调用这个钩子,
     * 并return一个快照值
     * 这个快照值,可以在组件更新完毕里面获取
     * 在这个钩子里,可以获取到当前的信息
     *
     */

    /* 组件更新完毕 */
    componentDidUpdate(prevProps, prevState, snapshot) {
        console.log('componentDidUpdate执行了', prevProps, prevState, snapshot);
    }
    addCount = () => {
          let { count } = this.statesafds
        this.setState({ count: count + 1 })
    }
}
评论 (1)