搜索到
23
篇与
JavaScript
的结果
-
 简单剖析jQuery源码 (function (global, factory) { /* * * CommonJS 规范 * 用于执行传递进来的factory函数 * */ if (typeof module !== 'undefined' && typeof module.exports === 'object') { /* * * 当前是 nodejs 环境 * */ // .... } else { /* * * 当前是浏览器环境 * 浏览器环境直接执行factory函数 * */ factory(global); } })(typeof window !== 'undefined' ? window : this, function (window, noGlobal) { /* * * 返回一个jQuery出去 * 使其能够链式操作 * */ jQuery = function (selector, context) { return new jQuery.fn.init(selector, context); }; /* * * jQuery共有原型空间 * */ jQuery.fn = jQuery.prototype = { jquery: '1.0.0', constructor: jQuery, /* * * 将init返回出的对象改成数组 * */ splice: [].splice }; init = jQuery.fn.init = function (selector) { var list = document.querySelectorAll(selector); [].push.apply(this, list); }; /* * * init与jQuery共享同一个原型(空间) * */ init.prototype = jQuery.fn; /* * * noGlobal不存在时 * 表示当前环境是浏览器 * 给window挂上$ * */ if (!noGlobal) { window.$ = window.jQuery = jQuery; } return jQuery; });
 -
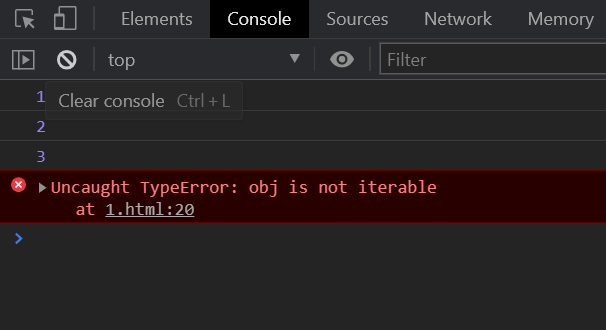
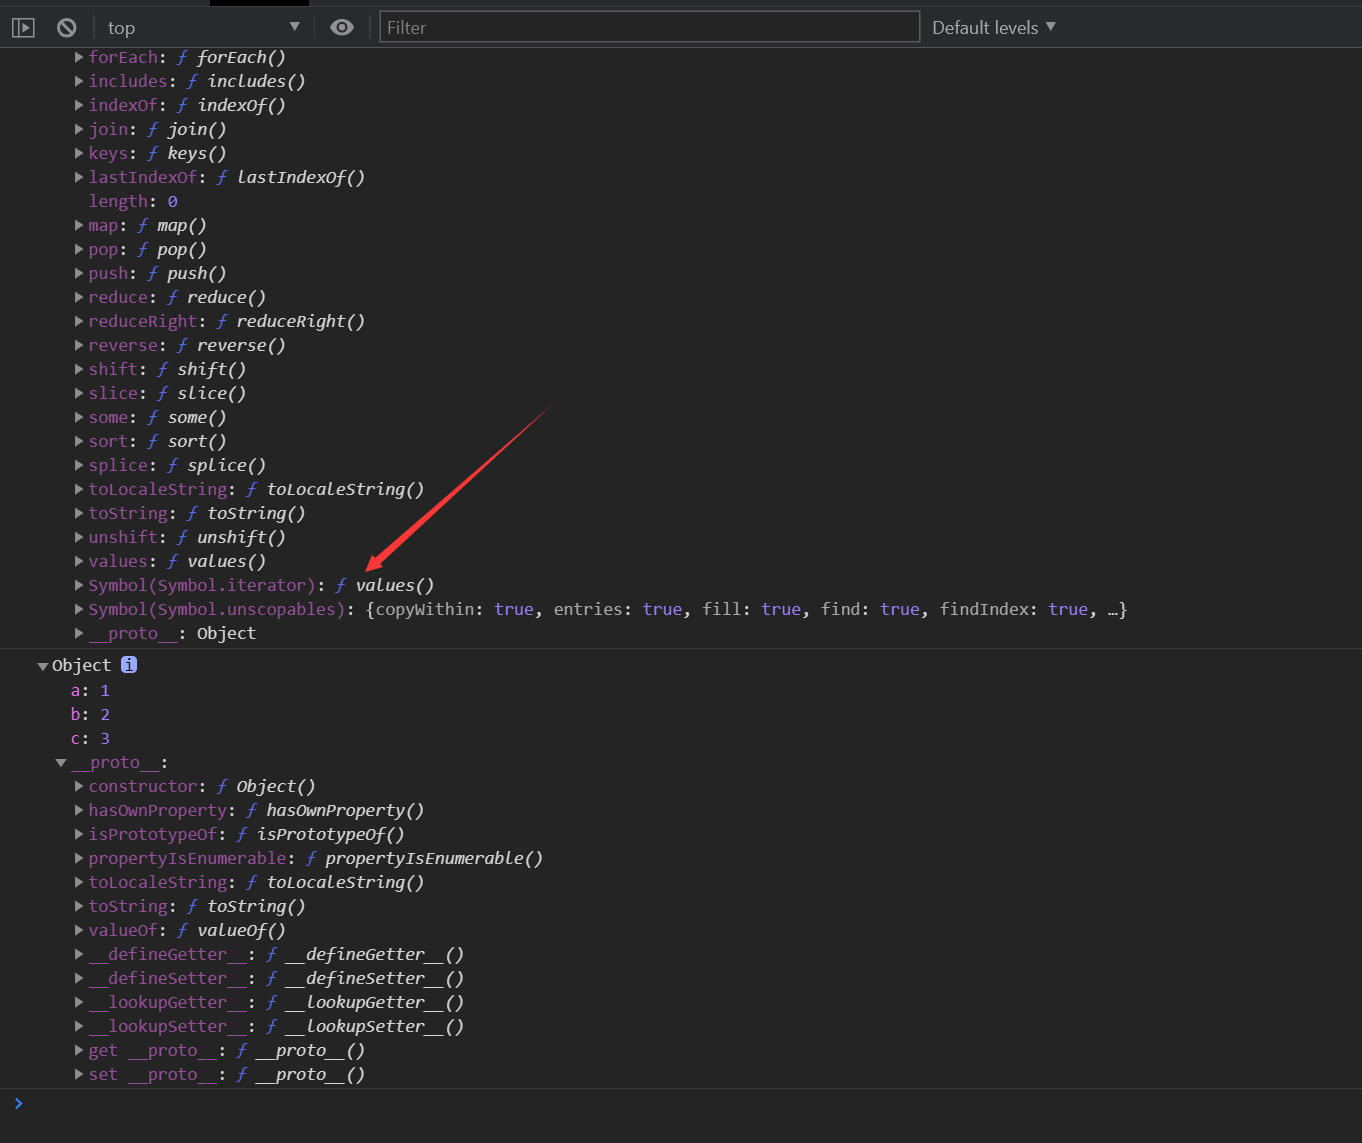
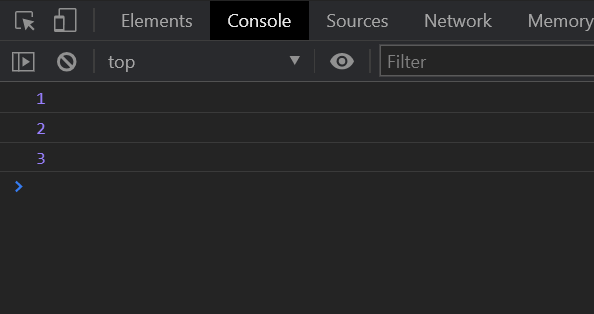
迭代器 我们都知道可以用 for...of... 来循环可迭代对象,例如循环 数组、字符串、Map、Set等,然后看这样一个例子例子使用 for...of... 来循环数组和对象,看是什么结果let arr = [1, 2, 3] let obj = { a: 1, b: 2, c: 3 } for(let val of arr) { console.log(val) } for(let val of obj) { console.log(val) }接着运行上面的代码,会出现以下报错信息:可以看到,数组正常循环没有问题,但是到了obj,会报:obj is not iterable(obj不是一个可迭代对象、obj不可被迭代)这是为什么呢?将arr和obj分别使用 console.dir() 进行打印查看let arr = [1, 2, 3] let obj = { a: 1, b: 2, c: 3 } console.dir(arr) console.dir(obj)可以看到,arr的原型上挂载着一个 Symbol[Symbol.iterator],而obj的原型上并没有这个属性,因此这就是为什么obj不可以被迭代的原因但是如果非得让obj也成为一个 可迭代对象,如何去实现呢?此时就需要给obj身上加上一个迭代器let arr = [1, 2, 3] let obj = { a: 1, b: 2, c: 3 } obj[Symbol.iterator] = function () { /* 必须得return 一个对象出去 */ return { /* 这是固定写法 */ next() { /* next也需要return一个对象出去 */ return { value: '1', // value 当前迭代出去的值 done: true // 如果为true,表示迭代结束,false表示迭代没结束 } } } } for (let item of obj) { console.log(item) }运行上方的代码,会发现控制台不显示任何内容,也就是 for...of... 并没有循环,这是为什么呢?因为next里面直接return出去了一个done为true的值,表示迭代结束,此时迭代直接结束,就没有了循环,因此将上方代码改造如下:let arr = [1, 2, 3] let obj = { a: 1, b: 2, c: 3 } obj[Symbol.iterator] = function () { let values = Object.values(obj) let index = 0 /* 必须得return 一个对象出去 */ return { /* 这是固定写法 */ next() { if (index >= values.length) { return { done: true // 此时迭代结束,就不需要再return value出去 } } else { return { value: values[index++], done: false } } } } } for (let item of obj) { console.log(item) }运行上方的代码,此时obj已经可以使用 for...of... 进行循环,并且此时的obj已经是一个可迭代对象接着不使用上方的 for...of... 进行迭代,使用手动进行迭代,分析这个步骤let arr = [1, 2, 3] let obj = { a: 1, b: 2, c: 3 } obj[Symbol.iterator] = function () { let values = Object.values(obj) let index = 0 /* 必须得return 一个对象出去 */ return { /* 这是固定写法 */ next() { if (index >= values.length) { return { done: true // 此时迭代结束,就不需要再return value出去 } } else { return { value: values[index++], done: false } } } } } let values = obj[Symbol.iterator]() console.log(values) // 得到迭代器对象,里面含有next方法 console.log(values.next()) // done:false(表示可以继续迭代),并且value为1 console.log(values.next()) // done:false(表示可以继续迭代),并且value为2 console.log(values.next()) // done:false(表示可以继续迭代),并且value为3 console.log(values.next()) // done:true(表示迭代结束)接下来就是迭代相关的专业话语看完上面的原理,再来看迭代器相关的话语1、迭代协议:规定迭代与实现的逻辑(也就是上面迭代器里的逻辑)2、迭代器:具体的迭代实现逻辑(也就是上面的迭代器函数)3、迭代对象:可被迭代的对象,已经实现[Symbol.iterator]方法的对象(就是上面加了迭代器后的obj)


-

-

-
 Object.defineProperty与Proxy的使用 这个方法的主要用处是用来做数据劫持的,在vue2.x主要使用这个方法,在3.0中换成了proxy做数据劫持,数据劫持就是监听到数据的变化,然后可以做什么等Object.defineProperty/* 随便定义一个对象 */ let obj = { name: 'hello', age: 18, child: { sex: '女' } } observer(obj) function observer(obj) { /* 判断传入进来的是否是对象 */ if (obj.constructor === Object) { /* 循环对象 */ for (let key in obj) { /* 如果值不是对象,则做劫持 */ if (obj[key].constructor !== Object) { /* 定义一个临时变量,用于return出去 */ let _value = obj[key] Object.defineProperty(obj, key, { /* 设置属性可以被删除,可以被修改 */ configurable: true, /* 设置属性可以被遍历 */ enumerable: true, get() { console.log('触发读取') return _value }, set(newVal) { console.log('触发修改') _value = newVal } }) } else { /* 否则进行递归,再次判断 */ observer(obj[key]) } } } }Proxylet obj = { name: '小红', age: 1 } obj = new Proxy(obj, { get(target, key) { console.log(target) console.log(key) }, set(target, key, newVal) { console.log(target) console.log(key) console.log(newVal) } }) console.log(obj)
 -
 自行封装一个深拷贝的函数 在实际项目中,经常使用到深拷贝,索性封装成一个函数function deepCopy(obj) { // 1、为了兼容数组和对象,所以写一个兼容性赋值 let newObj = Array.isArray(obj) ? [] : {} // 2、接下来进行循环传进来的对象 (for...in...也会循环原型链上的内容) for(let key in obj) { // 3、因为for...in会循环原型链上的内容,而我们深拷贝的新对象无需原型链上的内容,因此加一层原型链判断 if(obj.hasOwnProperty(key)) { // 判断是非原型上的数据 // 4、接着判断是复杂数据类型,还是基本数据类型,如果是基本数据类型,直接赋值就行 if(typeof(obj[key]) !== 'object') { // 基本数据类型 newObj[key] = obj[key] } else { // 复杂数据类型,递归再次进行判断 newObj[key] = deepCopy(obj[key]) } } } return newObj } // 接着验证上面函数 let obj = { name: 'lis', fn: () => { console.log(1) }, child: { age: 1, son: [] } } let newObj = deepCopy(obj) console.log(newObj)
 -
 为你的网站添加点击散开特效 将以下代码复制到你网站最底部即可实现<canvas id="fireworks" style="position: fixed; left: 0px; top: 0px; pointer-events: none; z-index: 2147483647; width: 1920px; height: 151px;" width="3840" height="302"></canvas> <script type="text/javascript" src="https://cdn.jsdelivr.net/npm/animejs@3.0.1/lib/anime.min.js"></script> <script type="text/javascript"> function updateCoords(e) { pointerX = (e.clientX || e.touches[0].clientX) - canvasEl.getBoundingClientRect().left, pointerY = e.clientY || e.touches[0].clientY - canvasEl.getBoundingClientRect().top } function setParticuleDirection(e) { var t = anime.random(0, 360) * Math.PI / 180, a = anime.random(50, 180), n = [-1, 1][anime.random(0, 1)] * a; return { x: e.x + n * Math.cos(t), y: e.y + n * Math.sin(t) } } function createParticule(e, t) { var a = {}; return a.x = e, a.y = t, a.color = colors[anime.random(0, colors.length - 1)], a.radius = anime.random(16, 32), a.endPos = setParticuleDirection(a), a.draw = function() { ctx.beginPath(), ctx.arc(a.x, a.y, a.radius, 0, 2 * Math.PI, !0), ctx.fillStyle = a.color, ctx.fill() }, a } function createCircle(e, t) { var a = {}; return a.x = e, a.y = t, a.color = "#F00", a.radius = .1, a.alpha = .5, a.lineWidth = 6, a.draw = function() { ctx.globalAlpha = a.alpha, ctx.beginPath(), ctx.arc(a.x, a.y, a.radius, 0, 2 * Math.PI, !0), ctx.lineWidth = a.lineWidth, ctx.strokeStyle = a.color, ctx.stroke(), ctx.globalAlpha = 1 }, a } function renderParticule(e) { for (var t = 0; t < e.animatables.length; t++) e.animatables[t].target.draw() } function animateParticules(e, t) { for (var a = createCircle(e, t), n = [], i = 0; i < numberOfParticules; i++) n.push(createParticule(e, t)); anime.timeline().add({ targets: n, x: function(e) { return e.endPos.x }, y: function(e) { return e.endPos.y }, radius: .1, duration: anime.random(1200, 1800), easing: "easeOutExpo", update: renderParticule }).add({ targets: a, radius: anime.random(80, 160), lineWidth: 0, alpha: { value: 0, easing: "linear", duration: anime.random(600, 800) }, duration: anime.random(1200, 1800), easing: "easeOutExpo", update: renderParticule, offset: 0 }) } function debounce(fn, delay) { var timer return function() { var context = this var args = arguments clearTimeout(timer) timer = setTimeout(function() { fn.apply(context, args) }, delay) } } var canvasEl = document.querySelector("#fireworks"); if (canvasEl) { var ctx = canvasEl.getContext("2d"), numberOfParticules = 30, pointerX = 0, pointerY = 0, tap = "mousedown", colors = ["#FF1461", "#18FF92", "#5A87FF", "#FBF38C"], setCanvasSize = debounce(function() { canvasEl.width = 2 * window.innerWidth, canvasEl.height = 2 * window.innerHeight, canvasEl.style.width = window.innerWidth + "px", canvasEl.style.height = window.innerHeight + "px", canvasEl.getContext("2d").scale(2, 2) }, 500), render = anime({ duration: 1 / 0, update: function() { ctx.clearRect(0, 0, canvasEl.width, canvasEl.height) } }); document.addEventListener(tap, function(e) { "sidebar" !== e.target.id && "toggle-sidebar" !== e.target.id && "A" !== e.target.nodeName && "IMG" !== e.target.nodeName && (render.play(), updateCoords(e), animateParticules(pointerX, pointerY)) }, !1), setCanvasSize(), window.addEventListener("resize", setCanvasSize, !1) } </script>
 -
 JS封装获取文件大小的函数 封装的函数function formatBytes(bytes, decimals = 2) { if (bytes === 0) return '0 Bytes'; const k = 1024; const dm = decimals < 0 ? 0 : decimals; const sizes = ['Bytes', 'KB', 'MB', 'GB', 'TB', 'PB', 'EB', 'ZB', 'YB']; const i = Math.floor(Math.log(bytes) / Math.log(k)); return parseFloat((bytes / Math.pow(k, i)).toFixed(dm)) + sizes[i]; }使用方法formatBytes(file.size, decimals = 2)
 -
 原生JS实现一个验证码功能 定义一个用于显示验证码的canvas<canvas width="100" height="40"></canvas>生成JS的业务逻辑// 获取canvas let canvas = document.querySelector("canvas") let context = canvas.getContext("2d"); // 定义初始化验证码内容 let nums = ["1", "2", "3", "4", "5", "6", "7", "8", "9", "0", 'A', 'B', 'C', 'D', 'E', 'F', 'G', 'H', 'I', 'J', 'K', 'L', 'M', 'N', 'O', 'P', 'Q', 'R','S', 'T', 'U', 'V', 'W', 'X', 'Y', 'Z', 'a', 'b', 'c', 'd', 'e', 'f', 'g', 'h', 'i', 'j', 'k', 'l', 'm', 'n', 'o', 'p', 'q', 'r', 's', 't', 'u', 'v', 'w', 'x','y', 'z']; drawCode() // 绘制验证码 function drawCode() { context.beginPath() /* 绘制背景色 */ context.fillStyle = "cornflowerblue"; context.fillRect(0, 0, canvas.width, canvas.height) /* 绘制验证码 */ context.fillStyle = "white"; context.font = "25px Arial"; let rand = [], x = [], y = [] for (let i = 0; i < 5; i++) { rand[i] = nums[Math.floor(Math.random() * nums.length)] x[i] = i * 16 + 10; y[i] = Math.random() * 20 + 20; context.fillText(rand[i], x[i], y[i]); } /* rand就是生成后的结果, 后面用来判断验证码输入框是否与该值相等 */ console.log(rand); //画3条随机线 for (let i = 0; i < 3; i++) { drawline(canvas, context); } // 画30个随机点 for (let i = 0; i < 30; i++) { drawDot(canvas, context); } } // 随机线 function drawline(canvas, context) { //随机线的起点x坐标是画布x坐标0位置,y坐标是画布高度的随机数 context.moveTo(Math.floor(Math.random() * canvas.width), Math.floor(Math.random() * canvas.height)); //随机线的终点x坐标是画布宽度,y坐标是画布高度的随机数 context.lineTo(Math.floor(Math.random() * canvas.width), Math.floor(Math.random() * canvas.height)); context.lineWidth = 0.5; context.strokeStyle = 'rgba(50,50,50,0.3)'; context.stroke(); } // 随机点 function drawDot(canvas, context) { let px = Math.floor(Math.random() * canvas.width); let py = Math.floor(Math.random() * canvas.height); context.moveTo(px, py); context.lineTo(px + 1, py + 1); context.lineWidth = 0.2; context.stroke(); }
 -
 JS通过解构或Object.assign去合并2个对象 在封装插件的时候,经常会碰到传入参数和默认参数的问题,如果调用者没有传递参数,那么使用插件的内置属性,如果传递了,那么就设置成传递的参数,例如:这是一个弹窗插件class Dialog { constructor(options = {}) { // 插件的默认配置 const defaultOption = { title: "提示", size: "small", show: false } for (let key in options) { defaultOption[key] = options[key] } } } new Dialog({ title: '标题', size: 'mini' })传统的会使用上面的for循环,然后将默认参数里的参数替换掉,在ES6出来后,上面的写法就可以改成下面的简写第一种方式class Dialog { constructor(options = {}) { // 插件的默认配置 const defaultOption = { title: "提示", size: "small", show: false, // 通过展开运算符 ...options } } }第二种方式class Dialog { constructor(options = {}) { // 插件的默认配置 const defaultOption = { title: "提示", size: "small", show: false } // 通过Object.assign方法 const newOption = Object.assign(defaultOption, options) } }
 -


